Sunday 25 August 2013

SEO - Basics and Importance

It will be really helpful for everyone and i hope you learn from it


Primitive Steps

Before selecting a domain, you need to be clear with the idea of what you want to do with and what is unique in your idea.
For this i will like to suggest you that make a task list and mark all the points that you want to formulate for your site.
Now this is the time you need to find a good domain name, even if you don't have a good domain name you will still do good if you have a unique niche. But do believe me if you don't have unique niche than it will be pretty difficult to improve your ranking.
After this you should create a rough sitemap and what type of content you will add to your site.
When you are done with all this stuff now is your time to find a good host and upload all your content and you are ready to go.

Site is Up, Now what should i do
It is now time that you need to upload all the content to your site. ( Remember that always add unique content to your site)
Now you need to make a sitemap for your site so that the search engine can scan your whole website and understand what content is present at which place.
To create a sitemap you can use free Google or bing webmasters tool.
Google webmasters tool

Targeted Traffic
Targeted traffic means that you need to have people who are actually interested in the stuff that your website offers. For example :-
If i am having a gaming website then what good will it do if i invite a website designer there ? They might visit 1-2 time when you ask but that will not become regular visitor because the content is not of their interest.
Meta Tags and Meta Description are always advised by the webmasters to implement in their site. The use of meta tags is they allow webmasters to give a short description about their website to the users who are looking up in the search engine. Tags always help to segregate content from other websites.

Submit your site to search engines and Directory
It is very important that you want to add your website to search engines because that's when search engine will know that their is a site EXAMPLE which EXAMPLE-CONTENT.
The important search engine that you should add your content to are
Google,
Bing
Yahoo which is automatically added if you add your site to bing.
Ask, Baido Lycos are more than enough
Directory that you should submit your site to->
The open directory DMOZ ( Most difficult to add your, you need to have unique niche and content )
These are some links of web directories
http://www.greatdirectories.org/
http://www.bedzzzinn.com/50free.html

Importance of Social Media
The role of social media for a website is very important. If your website can have implementation of Socail media it will be great because everyone has the social media accounts these days.
For promotion of your site social media is important. You should remember that mouth to mouth advertising is better and always give good results.
Sharing of webpages result in a huge amount of audience to know about the site.

Keyword Research
Keywords are really important for your website, if you are not an expert then also you can do good. For this you need to visit your competitors websites and check what niches they are using, what type of content they are using, how are they promoting their site. Thoroughly analyze all of these and you will come up with your own niche and method. It is advised that you should often update your keywords depending upon Fresh content.
After you research your keywords, and implement on your site, you should always invest some money on Google adwords because it will help you get a lot of traffic to your site from appropriate keywords. Adwords is one of the main source of Google income and it is really powerful tool for a webmaster. So use it wisely with proper keywords. You can also check your stats in Google analytics and it is a great too to use

Now you will be thinking why are we doing this? Why not have my site running and i just upload my stuff ?
The ANSWER is that we are making our website friendly for search engines.
There is a difference between human beings and search engine bots. Usually we say them bots or spider or crawler. The reason is that they use to crawl from one link to another and then to another. They do this all the time. Now if you have unique niche the bots will know that where they can go when EXAMPLE is typed. They use backlinks for this purpose as well. I have explained about backlinks below. Search Engine bots do following things:-
  • Searching
  • Crawling
  • Indexing
  • Processing
  • Relevancy
  • Retrieving
These are some important things that they do.
You must have seen websites showing Google Bot, Alexa Internet Bot, Bing Bot, Yahoo Bot, Lycos bot, baidu Bot
These are some example of the bots and for them to show our website on the top of their pages when anyone searches on search engine, we do this. This is the answer to your question.

What are Backlinks
Backlinks mean that those links from which a user can come to your site and from which a user can go to other site. That is if use can come to your site it is inbound backlink and if use can goto your site then it is outbound backlink. The backlinks are an Important aspect of SEO, because they decided your popularity. Search engines have the habit of giving more rank to the site which more number of backlinks.
Backlinks should always be made with the websites which have content relevant to yours. If you are making irrelevant backlinks then it is of no use. Anchor test should be used to decide what should be the text that you should use with the link to make relevancy of backlinks. If you link your website on improper places then we call then bad nebghour because they are of no use to us.
There are a lot of software that helps you to make backlinks as well.

Robots.txt
Sometimes you do not want your site to scan your full website, you need some part that you want to keep private. This can be done by adding a text file called robots.txt in the root.
You can again use google webmasters tool to create robots.txt and it is pretty easy to do as well.

Finally Search Engine is not a process that can result in a day or a week.
You can see the result of SEO in a month and you will definitely like it.
I hope you learned somethings from this tutorial, feel free to ask any questions from me.

Thank You Very Much for reading, hope you like it

 
Read More


90+ Places To Submit Your Blog/RSS Feed free

http://www.bloglines.com/
http://www.bloghub.com/
http://www.plazoo.com/
http://www.redtram.com/
http://www.icerocket.com/
http://www.rss-feed.org/
http://www.blogcatalog.com/
http://www.bloghop.com/
http://www.weblogalot.com/Ping/
http://portal.eatonweb.com/
http://www.blogged.com/
http://blogs.botw.org/
http://www.bloggapedia.com/
http://www.feedcat.net/
http://www.feednuts.com/
http://www.feeds4all.nl/
http://www.rss-spider.com/
http://www.rssmountain.com/rss_directory.php
http://www.bloglisting.net/
http://www.topblogging.com/
http://www.superblogdirectory.com/
http://www.millionrss.com/
http://www.feedage.com/
http://www.blog-directory.org/
http://www.blog-watch.com/
http://www.addurlblog.com/
http://feedshark.brainbliss.com/
http://chordata.info
http://www.jordomedia.com/
http://www.2rss.com/
http://www.findrss.net/
http://www.feedlisting.com/
http://freefeedsdirectory.com/
http://blog.directory-seek.com/
http://theblogresource.com/
http://blogville.us/
http://sarthak.net/blogz/add.php
http://www.submitblognow.info/
http://dir.blogflux.com/
http://www.lsblogs.com/
http://www.feedbees.com/
http://www.feedsee.com/
http://blogit.a1weblinks.net/
http://www.bitshacking.com/
http://www.rsshugger.com/
http://www.blogsweet.com/
http://blogoriffic.com/
http://www.jordomedia.com/
http://www.blogbunch.com/
http://www.webloogle.com/
http://www.readablog.com/default.aspx
http://www.feedgy.com/
http://www.myblog2u.com/
http://www.blog-collector.com/
http://www.iblogbusiness.com/
http://www.mvblogs.com/
http://www.blogtagstic.com/
http://www.freewebs.com/blogotion/
http://www.topblogarea.com/
http://www.goldenfeed.com/
http://feedfury.com/
http://www.bitshacking.com/
http://www.bloggeries.com/
http://www.feedgy.com/
http://blogannounce.info/
http://www.rssmad.com/
http://www.blogbib.com/
http://www.bloggernow.com/
http://www.blog-search.com/
http://blogtoplist.com/
http://www.photarium.com/
http://www.goldenfeed.com/
http://www.blog-search.com/
http://anse.de/rdfticker/addchannel.php
http://blogclicker.com/
http://www.blogsrating.com/
http://www.yourwebloghere.com/
http://www.feedmil.com/
http://www.rssbuffet.com/
http://www.blloggs.com/
http://www.search4blogs.com/blog/
http://rss001.com/
http://feeds2read.net/Rss-Directory
http://www.rss-network.com/submitrss.php
http://www.blogbal.com/
http://www.rssmicro.com/
http://www.blogobbler.com/
http://www.sarthak.net/blogz/
Read More


KRE-O CityVille Invasion v1.1.8 Mod + Money [Andriod]

KRE-O CityVille Invasion v1.1.8 Mod + Money
As Commanding General of the CityVille S.O.S. Force™, you must stop the evil Dr. Mayhem™ and his minions from conquering your city, and the world!

Construct automatic defenses AND personally control your powerful KREON™ soldiers in this mind-blowing game of tower-defense and live-action battle. As you play you can build cooler and more powerful defenses and upgrade your soldiers' skills, weapons and armor!
KRE-O CityVille Invasion features eyeball-popping 3D graphics. Can you make your city powerful enough to defeat Dr. Mayhem's mighty army? You'd better - the world's counting on you!
BONUS ITEMS
Unlock cool bonus items with codes you get in KRE-O™ CityVille™ Invasion™ construction sets. 


KRE-O CityVille Invasion v1.1.8 Mod + Money

KRE-O CityVille Invasion v1.1.8 Mod + Money

KRE-O CityVille Invasion v1.1.8 Mod + Money

Download Click Here 


Read More


Saturday 24 August 2013

How do I customize my template

For color and the font size, some Blogger templates offer an option to change it from the Dashboard (Dashboard → Design → Template designer → Advanced or Dashboard → Template → Customize → Advanced in the new Blogger design). Here, you can see the result directly in the template.
blogger-template-designer
Major changes in the templates needed to know at least a little CSS and HTML. A quick way to modify a template is change the images in the CSS code, for others with the same dimensions. That is the process to change the header of a design, for example.
Additionally, some templates have their own settings instructions and customization, refer to the same download page of your template.

How can I edit the menu of my template?

1. Most templates have a menu that can only be edited from the HTML (Dashboard → Design → Edit HTML or Dashboard → Template → Edit HTML in the new Blogger design). In many cases the code to look for is like:

 <li class='current'><a expr:href='data:blog.homepageUrl'>Home</a></li>
 <li><a expr:href='data:blog.homepageUrl + &quot;feeds/posts/default&quot;'>Posts RSS</a></li>
 <li><a expr:href='data:blog.homepageUrl + &quot;feeds/comments/default&quot;'>Comments RSS</a></li>
 <li><a href='#'>Edit</a></li> 
 
There you can edit the expr:href=’…’ code, with your own links: href=’http://mylink…’. Also see the instructions in your template for more information.
2. Some templates include a link list widget or a pages widget to edit the menu directly from the Dashboard.
  • For link liks widget: Dashboard → Design → Page Elements. Or Dashboard → Layout in the new Blogger design.
  • For pages widget: Posting → Edit pages → New pages. Or Dashboard → Pages → New Page in the new Blogger design.

How to go back from Dynamics Views to standard templates

If you are using the new Blogger templates, called Dynamics Views, you don’t have access to most templates on the web.
To go back from Dynamics Views to standard templates you only need:
  1. Go to Template designer (Dashboard → Design).
  2. Click on “Revert to previous template”.
That’s it. Now each time you enter in ‘Design’ section, you will be able to upload custom templates again.
 

Why the date is displayed as “undefined” or this is not show?

Probably because you don’t choose the right date format. The format should be changed from the panel and usually the correct types are:
1. Dashboard → Settings → Language and formatting → Date Header Format
date-header-format
Or
2. Dashboard → Settings → Language and formatting → Timestamp Format
timestamp-format
Read the instructions of your template located on the download page.

Read More

How To Install Blogger Template  

 
Read More


Get Free dofollow backlinks

I Want To Link To Your Site

I want to do you a favor and give you a free back link.

What’s The Catch?

There is no catch.
No strings attached.
No orangutans to wrestle.

How To Get Your Free Backlink

Leave a comment like this:

1. Your target keywords

2. Your Email

3. Your url

4. Type free links

5. Press submit button

6. you are done
Read More


Friday 23 August 2013

Helix Free Blogger Template


Features:
Instructions: How to install a Blogger template
Template author: NBThemes
Designer: Fab Themes
Description: Helix is a free blogger template adapted from WordPress with 3 columns, left and right sidebars and social bookmarking icons.
Excellent layout for blogs about any general topic or crafts.


Download Click Here


Read More

How To make 100$ in 2 days 

Earn 400$ daily 

Earn Money with facebook 500$

How To Make 6$ instantly Payout via payza 

 
Read More


How to install a Blogger template

If your are using Dynamic Views, you need first go to Design (Dashboard → Template) and then click on “Revert to classic templates → Revert to classic template”.
1. Download the template and unzip the file (you can use a free unzipper software).
unzip-template
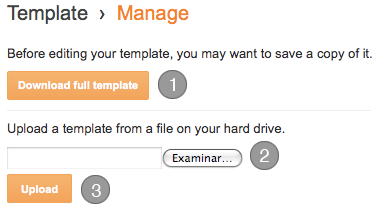
2. Go to your blog template section (Dashboard → Template → “Backup / Restore” button).
In the old Blogger design: Dashboard → Design → Edit HTML .
3. Backup your previous template (Download full Template).

In the old Blogger design:
upload-template
4. Find and upload the xml file of your template.
5. If you see a warning like following:
warning-install-template
Click “keep widgets“.
6. Enjoy! :)

Why I can’t install a template? Blogger gives an error.

There are several possible factors that cause an error Bx-xxxx:
  • The code is directly copied, and Blogger did ‘t interpret it.
  • Temporarily Blogger  is not accepting  templates with certain codes or gadgets.
Possible solutions:
  • Remove widgets or gadgets that come with the template downloaded.
  • Clear your browser’s cookies.
  • Trying to upload the template with a different browser (Opera, Firefox, Chrome).
  • No copy and paste the code directly, upload the xml file.
  • Wait 24 hours and try again. 

How do I log in to my blog without the navbar?

The Blogger navbar is just a plug and provides a shortcut to enter your blog, but you can always log in from Blogger.com.

How To customize Blogger Template

Read More

How To make 100$ in 2 days 

Earn 400$ daily 

Earn Money with facebook 500$

How To Make 6$ instantly Payout via payza 

 
Read More


How to Insert Adsense ads in all Posts in a WordPress Blog

When it comes to monetizing a WordPress blog with ads under a post title or below the post or in between the posts it is so simple to do with a plugin. If you have a blogger blog then you need to open the template through blogger dashboard and can embed the ad code. But in WordPress if you want to do it manually then you need to spend some time with the functions.php file in your theme page or else you need to manually place code in each and every post. If you don’t want to mess up things with a php code or waste your valuable time by pasting the ad code in each and every post, then to ease your efforts there is a simple plugin I would recommend which is called as Ad injection and don’t worry this is a free plugin.
Installing Ad injection:

All you need to do is search for Ad injection in the search plugins page and install this plugin and activate it.
ad injection How to Insert Adsense ads Automatically in all Posts in a Wordpress Blog

Benefits of Ad Injection:

  • This plugin is not limited to only adsense or few publishers you can add ad code from any publisher and even you can add your own custom banner ad (e.g. Google AdSense, Amazon Associates, ClickBank, TradeDoubler, etc).
  • Have more control of random ads by exactly determining the number and placement.
  • Can disable ads on few selected pages like Home, Archives, search, about us, contact us etc.
  • Can handle CSS codes easily to float the ads to either left right or center.

Configuring Ads through Ad injection:

After installation you can get this plugin in the settings page and when you click on it you will be directed to the ad injection settings. Here you have a variety of option to play with. First you would be having a widget where you have the ability to enable and disable ads in whatever page you choose.
ad injection 2 How to Insert Adsense ads Automatically in all Posts in a Wordpress Blog
In order to enable your Ads you need to click on the On: Ads enabled
If you want to disable Ads you can select Off this is done when you are effected with click bombing. You need not remove your ad code but simply you can check off and your Ads won’t be displayed.
Third option is Test Mode where ads can be visible only to admin so that he can test and see how ads look after enabling them to display. After you feel the ads placements are good you can enable them to all visitors.
ad injection 3 How to Insert Adsense ads Automatically in all Posts in a Wordpress Blog
Immediately after these three options you have an option called Tick to disable ads. Here you can disable ads on pages like 404, home page, search page, Archieve pages etc. So if you don’t want your ads to be displayed on your about us, Contact us, Privacy policy you can disable them by checking the appropriate box. You can also disable only a particular ad unit too it could be a top ad, bottom ad or even a random ad for a particular page.
Next you would have some more options where you can select options like displaying ads only on posts which are longer than 100 words, 200 words or as per your wish.
ad injection 4 How to Insert Adsense ads Automatically in all Posts in a Wordpress Blog
You also have an option to set Maximum number of random ads per post. Adsense and even few publishers support only 3 ad units or some four so you can limit the random ads to 2 or 3 depending on the Terms of your publisher. There are more options in this section which can be easily understood.
Immediately after the settings widget you have the important widget where your adsense code or any other ad code can be place. You can also adjust the placement by few options given in the right side. You can float your ad left, right or center. You can increase the margins or padding that all depends on how you want your ad to look in the space.
So there are four sections like Top ad it displays ads immediately after the post title, Random ad which is displayed randomly in between posts, bottom ad which displays ads below the post content and footer ad which displays ads on your footer section. Below these there are more options for an advanced user but for a basic user the settings which I have discussed are more than enough.

How to place ads without a Plugin:

If you want to place ads without using a plugin then you need to go with this method where you need to open your functions.php file of your theme and paste the following code.
<?php

//Insert ads after second paragraph of single post content.

add_filter( 'the_content', 'prefix_insert_post_ads' );

function prefix_insert_post_ads( $content ) {

 $ad_code = '<div>Ad code goes here</div>';

 if ( is_single() && ! is_admin() ) {
  return prefix_insert_after_paragraph( $ad_code, 2, $content );
 }

 return $content;
}

// Parent Function that makes the magic happen

function prefix_insert_after_paragraph( $insertion, $paragraph_id, $content ) {
 $closing_p = '</p>';
 $paragraphs = explode( $closing_p, $content );
 foreach ($paragraphs as $index => $paragraph) {

  if ( trim( $paragraph ) ) {
   $paragraphs[$index] .= $closing_p;
  }

  if ( $paragraph_id == $index + 1 ) {
   $paragraphs[$index] .= $insertion;
  }
 }

 return implode( '', $paragraphs );
}
In the above code you need to place your code where it says ad code goes here. If you want your ad code to be displayed after third paragraph you need to change the number 2 which is in red to number 3. Personally I use Ad injection plugin to configure ads in my WordPress blog. There are also many plugins to insert ads like Wp-Insert which also has almost same functions like ad injection. Now its up to you how you monetize your blog.
Credits for Code: Wpbeginner
Read More


10 Ways to Increase Adsense CPC

If you are a blogger and Adsense is your prime source of revenue, you can’t afford to ignore the importance of Adsense optimization. When we talk about Adsense optimization, there are many things but the main target is to get high eCPM and get more Cost per click. Else, despite of good Adsense CTR, you might not be making good money. This is something very common about non-English blog. If you fall in the category of those adsense publishers, who are getting huge traffic but Adsense earning is still low, it’s time to understand points which are mentioned below and this will surely helps to increase Adsense CPC and overall revenue.
Adsense CPC

What is Adsense CPC:

Lets start with answering basic question first and then we will move to some working tips to increase adsense CPC. CPC stands for Cost per click, in short money which you make/click is what CPC. Now, you might have noticed Adsense publisher talking more about CTR and less about CPC. If you are really serious about your Adsense revenue, you should work more on CPC than CTR. Getting thousands impression on your ad won’t be of much help but a blog with good CPC with decent CTR can create a huge difference. CPC has nothing to do directly with your traffic, if you would realize and noticed micro-niche blogs, you might have realized despite of less traffic such sites make more money from Adsense. Reason is simple and that is eCPM for such blogs are so high that you get paid really well for CPC and then there are other factors like Ad competition, Keywords and many more. Lets discus some of them here:

Factors that Affect Adsense CPC :

Niche
First thing first, choosing a right niche for your blog or website is of utmost important. Cost Per Click or CPC of an ad directly depends upon the topic on which you’re writing your blog.Well! Let me clarify one thing here that you’re going to choose niche however there are niches that can pay you high CPC. Yes! Here is the list of niches that can give you high return, I have arranged them in decreasing order of CPC.
  • Domains – Blogs on Internet Domains Like Yahoo, Go Daddy etc. It pays highest CPC.
  • Gadgets – Tech Gadgets like Apple products
  • Google – Google Products
  • Microsoft – MS office
  • Banking
  • Automobile
  • Health
  • Real Estate
  • Home Loans
  • Jobs
  • Dating & Romance – It pays lowest CPC.

Content
Second thing is the content, you must write content that should answer readers query. So before writing blogs try to find what your readers are searching on the Internet and then try to present them with solutions.
Remember you should always directly engage with your readers. Your content must be tailored according to your niche so that more and more readers can read your blogs. Hence good content will certainly ensure higher Adsense CPC rates. More over, Good content is what search engine loves, hence more click and more revenue if your ad is highly targeted and your traffic is from the countries like U.S.A, U.K. When you do a Keyword research, make sure to use Approximate CPC column.

Page Rank
Google Page Rank is not a new phenomena. In this your entire website or a particular page in a website are ranked from 1 to 10. Therefore try to rank above 4, if your PR is 5 or 6 then Google will show ads on your site which will pay you higher if someone clicks on them. Simply it means that ads of higher quality will be more shown on your website. For example your CPC will automatically increase from 10 cents to 40+ cents. So always try to improve the quality of your blogs as CPC directly depends on higher Page Rank.
Ad Review Center
In Google Adsense you will find Ad Review Center. You can go there and see yourself how much each ad category is paying you. This will show you different ads category that are showing on your website. If you find that any ad category is not paying much then feel free to block that category.
Try to block those category which are completely irrelevant to the content or niche of your blog. Suppose blog is about Technology then block the ad categories for Dating, Politics, Religion etc. This will surely increase your CPC and Adsense revenue.
Competitive Ad Filter
Just like Ad Review Center there is Competitive Ad Filter in Google Adsense. You can go there and block the specific or general ads from appearing on your web pages. You can block the ads for entire domain or just a particular website in that domain name.The ads that you would block may belongs to your competitors. Therefore you can increase your CPC by not showing those particular ads.
Platform
Your blogs are read from different platforms like desktop, laptop, mobile etc. Although CPC is generally not much affected by the platforms on which ads are shown but you should try your best to target as many as readers. You will get most of the readers from desktop and laptop devices.
If you are able to reach to hand-held or mobile readers than CPC may increase as ads shown on cellphones are of higher quality. If you are blogging on WordPress platform, you can use plugins like Wp touch which will make your blog mobile friendly and you server adsense ads which is optimized for mobile screen size.
Country
One of the most important factor that can increase CPC is the country you are targeting. For example a click on an ad from USA can pay you up to $2 to $3 and click on same ad from India can end up paying only 20 to 30 cents.
Hence always tailor your blog and its content to audiences in English-speaking countries. It will also increase Page Rank of your website. So always keep in mind the country you are targeting.
Text & Image Format
Perhaps I should have explained this suggestion in the beginning of the blog. Anyhow, you must know to choose right format for your ad. If you can place three ads on a page then choose two 336 X 280 ads and one 468 X 60 ad.
Then ad format must be text because text ads have higher CTR (click through rate). You can even try ad format for both text & image simultaneously as it gives you more CPC. Image ads are usually less preferred for both reasons less CTR and lower CPC. Though at times, depending upon the niche and blog type, image ads perform better in terms of higher CTR but CPC won’t be as good as text ads. Anyways, as I mentioned above it differs from niche type and most important ad placement.
Placement
Never neglect the placement of your ads on the web page as it is directly proportional to your Adsense revenue. So where to place ads for maximum CPC? Answer is simple. Place 2 ads inside your blog post and 1 outside the post.As far as placing inside goes then place one 336 X 280 rectangle ad on the top of the blog just below the title and place second 468 X 60 ad in between the blog post. Remaining one ad you can place on your right side that is outside your post.


Though it should be your choice and depending upon your reason of blogging. For example, if you are a professional blogger and dependent on Adsense, you should not miss a chance to optimize ad and use maximum possible ad units on a single page. Though if you are a hobby blogger or blogging on personal blog, your first target should be giving quality content and less ads, as readers hate advertisement which distract them from reading.
Let me tell you the maximum clicks and higher CPC will come from 2 ads which are inside the blog post especially on the top.
Keep Experimenting
Always keep trying something new. Experimenting can really pay you high dividends. You can try out for different niches, choose different ad placements and finally take as many as advice from Google Adsense center. Never bogged down into one style always try something new.
Conclusion
In conclusion I would only say if you follow and implement these 10 tips then you can surely increase your Adsense revenue from 30% to 40%. It is completely legal and genuine way to increase your earning in short time. You can also search for highest CPC adsense Keywords and compile one-two posts around it.

Read More


List of DoFollow Forums to Increase Backlinks

Dofollow blogs and Dofollow forums use the dofollow attribute and that helps you to boost your backlinks and give link love. Link juice from a high PR blog or forum is good for your blog to boost your Google page rank. Specially, if you are active in a niche forum which allows dofollow backlinks, you will not only get a quality link to your site but you will also be getting targeted traffic.
Here is a list of dofollow forum which have Google page rank, register there use your blog link as signature and make sure that you stay active as these forums are very active and you will get backlinks as well as traffic.
1 V7nForum
Siteowners Forum
Joomla Forum
Search engine watch Forum
CNET Forum
Mysql Forum
Digital point Forum
Affiliate Marketing Forum
Site Point Forum
10 Warrior forum
11 Capital Forum
12 Deviantart
13 Domain Name Forum
14 File Sharing Forum
15 Free Advertising Forum
16 Geek Village Forum
17 HTML Forum
18 MyGame Builder Forum
19 PhpBB Forum
20 Search Engine Roundtable
21 SEO Forum Australia
22 Siteowners Forum
23 Webhosting Forum
33 Directory junction Forum
You can use the below search button to search for more Dofollow Forum

Read More


List of Blogs that allow guest posting

Most of the blogs listed here are high quality blogs and they accept only quality posting. So, if you are using it for just link-building and self promotion, I suggest you to read that blog guest posting guidelines. Also, if you are new to ShoutMeLoud, we are a blog with over 300+ guest blogger and we accept posts related to Blogging, Make money online, SEO, Webhosting niche. You can read our

Blogging
There are some of the blogs who accept topics related to Blogging and related topics. Though, acceptance rate is very slow on many of them, for example you need to come with a masterpiece to get your post published on sites like Problogger, Dailyblogtips. Also, it takes time to see your post getting published. So, depending upon your requirement, you should check with every blog acceptance guidelines.
Technology:
SEO:
Social Media:
Designing:
Read More


5 Secrets to Promote Your Site Via Forum

We have already covered few topics on promoting a blog via forum. Few of them is  list of dofollow forums  Forums are a somewhat labor intensive but highly effective way to increase traffic and bring engaged visitors to your website or blog.  While search traffic is more likely to click ads, forum traffic will leave you comments and buy your products.  However if you go about using forums wrong, you will do more harm than good to your site.

Shopping for a Forum
Not all forums are created equal.  Some are small highly targeted affairs while others are large forums with very broad topics.  Some forums are pro-business and welcome a little self promotion (Warrior Forums is a good example) while other forums are communistic affairs that boot anyone who even breaths about their business online.
You will be making a serious commitment to any forum you plan to use for promotion, so shop like you would for a long term girlfriend/boyfriend.  Each forum develops a personality of its own so you and the forum better match up in style, interests, and approach to life.  If there is not a good match you will be frustrated and the promotion will fail.
Search “niche +forum” to identify possible candidates to join.
Use Your Profile
Choose an appropriate non-offensive but memorable user name and fill out your profile with some reasonable detail.  Do not include AIM and Yahoo profile links – only spammers do that.  Do include a link to your main website if there is a spot for it.  Look around at how much detail some of the forum thought leaders put in for a guide.
Use Your Signature
If the forum allows signatures definitely put an anchored link into your signature.  Be sure you understand the forum policies on signatures first though so you do not make enemies with the management.  If in doubt, ask first by private message.
Start and Respond to Topics
Regularly visit the forum, starting good topics and making intelligent comments.  Where it fits well into the conversation drop in the occasional anchored link to your blog, but make sure you are not offensive or off topic.
Don’t always link to your stuff, link to other interesting resources too.  Score big points by posting appropriate links to the blogs of the forum thought leaders and up and coming members.  Others might even reciprocate (but NEVER ask them too).
If you blog, occasionally you can write a killer post with a little controversy.  Post a summary and link to the forum as a new thread, asking others what they think.  Say something like “If I got this wrong please let me know“.  Participate in the resulting discussion, but not too much since your comments can end the discussion if everyone thinks you have your answer now.  This technique can be very effective to bring in traffic to your blog posts.
Be Engaging to Engage Others
Forget using a forum to promote yourself unless you are prepared to come to the forum regularly and contribute.  As a regular poster you will develop trust and make friends who will engage with you in your business, blog or websites.  As a rare poster you will be considered a lousy drive-by spammer worthy only of being banned.
Read More


How Commenting can help you get 1000 Feed subscriber in few days

When you start a new blog, your first target is to get new readers, traffic and subscriber. Out of all, I always suggest to start with getting more subscribers as they turn into return visitors and increase the trust value of your domain. Though, for a new blog it’s a tough task and in this post, I will share a tip which might be very useful for you to get targeted traffic and most important with your quality content you can turn them into subscribers.


So how commenting can help you grow your blog to next level?

The strategy is simple, you need to spare half an hour a day for the commenting.
Select few major website in your niche. Make sure the target users are the same as yours. Now I hope you keep track of all the feeds using feed-demon. If you do then I hope you manage folder like me or better than this.
The approach is, create different folders on your feed reader for different type of blogs which you are targeting to comment and get subscribers. It’s better, that all the blogs should be in same niche. For example, my niche is Blogging and technology, so I would create folders for the same niche and typically my folders are:
  • Popular Blogging blogs
  • Blogging blogs using top commentator plugin
  • Blogging blogs using comment luv plugin
  • Dofollow Blog comments on Blogging niche
Now, commenting on Popular blogging blogs willl help me get decent traffic and if content on my blog is compelling and interesting, I can expect good amount of conversion.
2nd and 4th type in the above list will give me SEO advantage and as backlink will be high quality relevent backlink and comment luv plugin enabled blog will help me to showcase my latest article, giving it more exposure. A good article title will do the trick to get more CTR.
Now spare 30 minute a day at least on commenting to these blogs updates. Make sure you add value rather than just a comment like Nice Thank you. If you keep track of blogs updates using twitter then you might be the lucky one to be the first one to comment. First commentator will always get more traffic and thus his comment will be more beneficial.
Suppose you be the first one to comment at problogger or gigaom, and first day you get 10 hits from the problogger, next day it goes down to 5 and gradually it decreases. But it will keep giving traffic once in a while. Suppose you make 10 such comments in a day.
Now let’s do simple calculation for a day.
Out of 10 comment strategy, 6 works for you (Worst case scenario).
  • So First day you will be getting 6*10= 60 visitors
  • 2nd day 4*10 = 40 visitors.
So you getting 100 visitors within two days from your niche sites. Now show them the best of your content,
So even if you are successfully converting 50% of such visitors to your loyal visitors, you will be getting 50 RSS subscriber within a day.
Worst case scenario, if you are a new blogger and not much content but if you manage to grab 5 RSS subscriber with this strategy, is int it better than spending an hour on writing content?
There are many other Factors which will help you here and those are :
  • Your Blog theme
  • Prominent Feed button
  • Ease of navigation
  • Apart from it most important good and quality content.
Read More


What is Backlink and How to Start Getting Backlinks to Your Blog

What is Backlink in SEO?

According to Wiki Article : Backlinks (or back-links [UK]) are incoming links to a website or web page. In the search engine optimization (SEO) world, the number of backlinks is one indication of the popularity or importance of that website or page (though other measures, such as PageRank, are likely to be more important). Outside of SEO, the backlinks of a webpage may be of significant personal, cultural or semantic interest: they indicate who is paying attention to that page.
In simple layman words :
What is Backlink in SEO
Backlink is number of inbound links from other blogs and website. More number of inbound links means better search engine ranking. In other word your blog will start gaining authority and chances of getting better page rank in the next update. Another advantage of backlink is that your website will start getting index as soon as you publish articles. This means your website is gaining authority and Google is giving weightage to your blog.
Also, if you are aware of Google Page Prank (Oops I meant Page rank), Backlinks from relevant domains helps you to get high PR in no time. I have explained the same in my Backlink case study for PR earlier.
Another common terms associated with Backlink is Anchor text. When ever we talk about quality links to your site, Anchor text plays a major role. If you are getting proper anchor text optimized backlinks to your site, you will be ranking higher in no time.

How to start getting backlinks?

So, by now you know what a Backlink in SEO means. Now, it’s time to learn few of the simple techniques to generate backlinks to your site. One thing which you should know about Backlink SEO is, it’s not the number of backlink which matters, but it’s the quality of links which matter. If you are using some paid services to get links to your site, you are more likely to get penalised by Google Penguin algo in future.

So the question remains how to get backlink for your blog?
  • Write Killer articles
  • Start Commenting
  • Submit to web directories
Write Killer articles
This is the best and simple way to get backlink for your blog, is write killer articles. Tutorials and top ten lists articles are a clear cut example of such post, which has great chances to get backlinks from other website as reference. Such articles are based on proper research and practical examples.
Start Commenting
Comments are the best and free way to get backlinks. Start commenting on dofollow forum, dofollow blogs and also on WordPress blogs using top commentator plugin. Though if I believe in latest news, that nofollow links doesn’t matter much, start commenting on any blog and you will be benefit with link juice. Commenting helps you to get one way solid backlinks and more over you will be getting traffic and better search engine visibility.
Submit to Web directories
This is another easiest way to get backlink by submitting your blog into Web directories. Though this method is not very popular now a days, because finding a legal web directories is not very easy. Specially avoid those web directories, which ask you to put a backlink to their website to get their website into directory. More over Stop using any automatic directory submitter if you are using any. Automatic   Website submission will make your blog look spam and it can cost you a lot in terms of your Page rank or completely removal of your blog from   search engine.

I hope this article will help you understand the basics of backlinks in SEO and why you should start working on getting backlink for your blog. Do you work on getting backlink for your blog? If not, start working on it from now on and forget about traffic and indexing problem.


Read More


Backlinks Strategies for Getting High Google PageRank

It is not easy to have quality backlinks . You will need to have proper strategy and patience to build backlinks and getting good Google Pagerank. Here are few strategies for building backlinks for your blog:
Think Quality not Quantity:
SEO strategies is all about quality, many bloggers fails in link building just because they think about quantity not quality of backlinks. It is important that you get 10 backlinks from PR4 or above blogs rather than getting 100 backlinks from blogs having PR1 or PR0 Pagerank. Make sure you get PR from same niche website. If you have a tech blog and you are getting backlink from a forex or medical website, that doesn’t make much sense to search engine, and Google might treat is like a paid link. Google never consider backlinks which you get from “ LinkFarm” websites or any link building softwares. In fact there are chances that your blog might get banned from Google.

Go for Same Niche:
When I started blogging, I made a mistake of not getting backlinks from blogs having same niche. But since I realized my mistake, I started getting backlinks from the blog of same niche or blog which complement your blog’s contents. I started commenting on blog with Top commentator plugin in my niche, Forum postings . Google likes the backlinks from same niche, it will surely result in good Pagerank.
Know about Link Popularity:
When a blog is adding your website link either through linkbacks or blogrolls, before linking back to that blog make sure that the blog is not an unethical or banned blog. Check out the details about blog and if you find the blog worth then only backlink to it. Few wrong linking from your blog can affect your blog’s link popularity and will result in degraded Google Pageranking.
Avoid Automatic Backlinking:
There are many softwares and online services available on internet, which will claim you to build quality backlinks but I would suggest you to never choose such method of backlinking for your blog. We all love our blog, why to backlink through such software which might result in loosing Google Pagerank. Always use straight way for link building like sending Emails to good blog, commenting on high PR blogs etc.
Read More


Earn $400 Daily Ebook

Read More


500_a_Day_facebook_fan Ebook

http://www.mediafire.com/?tt74o5no5o0yu5j

Read More

How To make 100$ in 2 days 

Earn 400$ daily 

How To Make 6$ instantly Payout via payza 

 
Read More


100$ 1-2 Days Adfoc Ebook

This method I am about to show you is promised for payout!  You can earn somewhere around 70$ per-day  I would only use this to gain around 150-200$ a month just to stay safe and make sure of payout!

Download Click Here

Read More

How To make 100$ in 2 days 

Earn 400$ daily 

Earn Money with facebook 500$

How To Make 6$ instantly Payout via payza 

 
Read More


How to make $6+ an hour! Paypal, Payza


1. Go to http://squarebux.com/?id=MVZ5P and make an account.
2. Add a random link or anything you would like to monetize.
3. Go to http://customhits.net/ and create an account.
4. Click "Add Link" and add your monetized link from Squarebux.
5. Earn coins. You can do this buy using the traffic exchange or buying coins.
6. LET THE MONEY ROLL IN!

So I found this PPC site and it pays well. I put one link in Custom Hits and the views sprung up instantly. I also saw the views on Squarebux go up. They are an amazing site and easy to use

Read More

How To make 100$ in 2 days 

Earn 400$ daily 

Earn Money with facebook 500$

 
Read More


Total Recall v1.3.0 with Coins+Gold Mod [PREMIUM] {Android}

free download total recall with coins and money
***Instructions***

1. INSTALL THE APK

2. UNZIP AND PLACE THE DATA FOLDER TO SDCARD/ANDROID/DATA

3. PLAY AND ENJOY


THE OFFICIAL GAME FOR SCI-FI MOVIE THRILLER TOTAL RECALL
Get a break from your mundane life and dive into the thrilling, sci-fi action game designed on the same lines as the fast-paced movie from the house of Sony Pictures.
Something has gone awry. You find yourself in the year 2084 and are running for your life. There are mysterious (and dangerous) assailants on your tail after a trip to the memory implant center ‘Rekall’ goes horribly wrong. The Fate of the World hangs in the balance, as the line between Fantasy and Reality dissolves into a Paranoid Dream.
UNLEASH YOURSELF INTO THE UNIQUE WORLD INSPIRED DIRECTLY FROM THE MOVIE
- Brand new user interface
- Step in as Douglas Quaid and fight your way through New Asia
- Travel to the core of the Earth
- Brand new Survival mode! Go right ahead and fight to survive
- Take up the all new CHINA FALL mission and complete the story
- All missions are in 3D, realistic and picked directly from the movie
- Walk through cutting edge 3D environments like Rekall Center, Red Light District, Apartment and the Rooftop
- Get briefed and debriefed about mission in a unique comic style
- Choose from a wide variety of weapons to fight wisely and fiercely
- New weapon textures
- Rip through the enemies with the rapid-fire GATLING LMG and the one-shot kill handgun, RHINO!
- Easy to learn controls
- Intuitive touch and tilt controls
- First person rail shooter
- Stay on-guard. You never know what̢۪s around the corner
- Free weapon on entering DVD code for Golden Eye gun
Total Recall Game is highly recommended for all fans of action, adventure and Sci-Fi thrillers, as well as those of First Person Shooter and Role Playing Games.


********************
What's New in this ver.
***********************

What̢۪s New? (MAJOR UPDATE, DOWNLOAD NOW!)
- New Game Levels: Finish the Story Mode with final level
- New Game Mode: Survival Mode
- New Weapon: Golden Eye for DVD Buyers
- AI & Weapons Balancing
- UI Optimization
- Enhanced and updated special effects & animations
- Bug Fixes & Performance Optimization 


Download Click Here

  
Read More


Thursday 22 August 2013

How To Add Image Between Blogger post

Step 1
Log into your blogger account, navigate to , Dashboard >> Layout >> Edit html, and find the following code
.post
this is the cs part that controls your post layout and style, it must contains few css properties like the following.
.post {
margin: 0 0 40px 0;
width: 90%
}
Now we want to add the separator css properties between the opening and closing tags, { and }
Here is the separator css properties :
background: url(Separator-Image-Url);
background-repeat: no-repeat;
background-position: bottom center;
margin:.5em 0 1.5em;
padding-bottom:2.5em;
And here is what you need to change in above code to customize it to your blog.
Separator-Image-Url
Change it to the separator image url,
2.5
If you found that the separator displayed behind part of your post latest line, increase this number, for example to 3.5 Or 4.5.
Now your final code should looks Like The following one.
.post{
margin: 0 0 40px 0;
width: 90%;
background: url(http://www.imagehost.com/separator.jpg);
background-repeat: no-repeat;
background-position: bottom center;
margin:.5em 0 1.5em;
padding-bottom:2.5em;
}
Free Separator Images
Now Here are some free Posts separators to use in your blog, just copy the image url and paste it in to it’s place in above code.


https://blogger.googleusercontent.com/img/b/R29vZ2xl/AVvXsEiAkZh7j6JFLE7iN6kn_XNqJnO4009MKgKH6s1VUgdCScWWuPJTCIWWK50ClCGnXUzlq3JPa37o14O8NSTXLSfVnfJqyTVEqCYzMjWdBHZxbCMCiynI7hvB9e8D3DQ4QuKTWmVkcwKcFVM/s1600/astarl7s.gif

 https://blogger.googleusercontent.com/img/b/R29vZ2xl/AVvXsEhzPojBpVcH4DpRUt5nR9WdoMoENaC3U81VXQ1xqI61Qc585HFPBwxMaqzXtettUAb1SsyUHfw7ZwFjPNmft7cy0GCbsIJKqtiqMP-i7BrDMF7s1RJn0IVCgHH_EZpJOCmSY3OFWp9bXwI/s1600/bar48.gif


https://blogger.googleusercontent.com/img/b/R29vZ2xl/AVvXsEjaP7IGtdSwNy5RMlT6ifbvgb8CwS_EfrSQh4U3ChCRQBAET-nb6qDUCBEeI8_E3kJrvmhsXMKHHbEKrdHtmv2JhqemaikrJbDbwn3PenLGHQbvvPDs7Q3pO8lCbfQuvHrYs-4I6k9UWNc/s1600/dividers_96.gif


https://blogger.googleusercontent.com/img/b/R29vZ2xl/AVvXsEiByOgsTO5Fr4fijSHli8KIxKCsRECphm2GT91UlQm7ClUwkK3V64sJ8gCwSbhJTz6lZa3_cNdZwSnIxDJvYHBBpHwEk-uvP63Jw2PF9bjcS5BAruB7ugrqKhV8CjSsfcO2ltUlqFQOLN0/s1600/clipart-heart-border.jpg


https://blogger.googleusercontent.com/img/b/R29vZ2xl/AVvXsEiiIuM_2VaPRwVEfExy2Ve8ojt-Mpp2_UK56j03N8VG_6n6lLYljATrW-B2bu97rOC5LM1ahONCdqeHKGuOeY4LgkALmbfBaEjpjW3vr12MettEODIv3JPs-qE8D5YUQkR8NoFYPWlVMnc/s1600/dividers_129.gif


https://blogger.googleusercontent.com/img/b/R29vZ2xl/AVvXsEhPU_ABCDWsvknIDWi9oEmXAJ0jIsISZF23K2ldMY6FW0vC8XKbKG0gbvGgLW_rxv9Wicv7tZq0Olt59-UxoBhoe4l0cEjB3CtoviL7W6QAtpquS3i4vYPP_Cj8Q0zzRWCSLWvBm_Wluw0/s1600/resfiles_sdfp.gif


https://blogger.googleusercontent.com/img/b/R29vZ2xl/AVvXsEiLxALvD2adgahWr0Z0vN_WFKic27WXWl0nwmuw-xb9CGrc-1mxjUDjaj36wuMbvYuzOYLDf_1JZF-NATO-ghVKvblwKIf66MybfV5rV3ieQT3UWc9yBoNbd0mIl1uuN6LJ5EVUF7PN6u8/s1600/resfileszcp.png


https://blogger.googleusercontent.com/img/b/R29vZ2xl/AVvXsEjDtEldlUv3POr7necBCXOnJQoIZ-kbMsxt-mFmL1tTj-72KCskAiZSyckjqiEsPfae-nuJBjd_-tYpsOKUZQKGSPTOfUj8hljK8IBkkADBuYKvYB7d7PHb3pKcAYVVs3BQY_0BAxqYAkE/s1600/irish-border3hth.gif


https://blogger.googleusercontent.com/img/b/R29vZ2xl/AVvXsEhFSo43tRzVqdXcc74rHkGhNMJJqNal3ix6RHyktw5yP4VcooaCjjzGXCMRCjUI7FkpnNFY0e0kiyTzClMo97FOYy4BbL_WCBf4-Q8axg0bE5O7ma1Au8qDFvDyN8IZst8lKjmZRsbUOqQ/s1600/maple-leaf-border-h.jpg


https://blogger.googleusercontent.com/img/b/R29vZ2xl/AVvXsEiJRyjz1STNRQiKU6a1CP_5wSf-7DgI3QLlKsEFB4_lR-lB0WhfkTU6miZjO1lqBB37_Y-VNzcjarcooj6CwavCdtIvBcjgl_rD5xB6E5LfMm0aWxhQYB1hVZ1qTEa5tI96J1E3sgGecx8/s1600/butterfly-border-hth.gif


https://blogger.googleusercontent.com/img/b/R29vZ2xl/AVvXsEg-quP4zgKXyU4v1OEU42unpxJcxEIuIm0hvlQA3dKj6mkTUUBvbA9LLY9SGqVXlfn-MtZ2YUkfl7cMWHi7GUiOX7wVlxQ7nji6OOZIJcv52EBHD4rzQ3MzNT7I9Ush-DknM1K3Ht3ARy4/s1600/bar47.gif


https://blogger.googleusercontent.com/img/b/R29vZ2xl/AVvXsEhSvCXM3aFuw2NFtol7j_DewOUU2i6q04ZEcKWi1ryGx4xKDuIdbsnyPVe30-JS4dwqITKBxft0tNbWZGLCtd6zU_BoJNZPYrF4sFqc2EPAe83C-mmzS_8yPIsCjJ3MmhycSeodis19zDg/s1600/chain.gif


https://blogger.googleusercontent.com/img/b/R29vZ2xl/AVvXsEimBYCRdnD-Upf8xLS8-T6GjT5oxZZOFUm6vWEusmrybzrdR4nSvj0O1gE6Xje2vbIxdqPfFRSKBAHCFm7FEpuH3RGkhYxDKMfr4XRIMjcVZPM_QpQhtuzIc1eThosdIdx1PnogiSZS0nE/s1600/irish-border4.gif


https://blogger.googleusercontent.com/img/b/R29vZ2xl/AVvXsEhJviyKcay5fos_62PXXTvHqk7APlOn7HQKmFtcVaZVGMQ-chyphenhyphen8D1NqQKAkEpX0_RuV4d084OJldWv_Ha8wDXyxVIVE93XIN_rFv0d2ISy0aFQwhUxKZjl7Uy0cWI3Ll8vw7vQ2oPKEUIs/s1600/drawing-separator.gif


To add line in blogger post

go here How to add line between blogger post


Read More


How to add an image in Blogger Post Title

blogger posts, gadgets for blogger, blogger tutorials

It has often been said that a picture says a thousand words, so in the struggle for the attention of the reader, we can add a picture or an icon to our post title, as I have put in the title of the post in the screenshot above.

Show Image Icon before Blogger Post Title

Step 1:

First thing first you have to do is to prepare an image. After that you'll need a direct link to an image before you proceed further. You can upload it to tinypic.com and copy the URL located in the Direct Link for Layouts box. Also, make sure your image is sized appropriately. You don't want to see a huge image next to your post title.

Step 2: Go to Dashboard - Template - Edit HTML - Proceed if needed
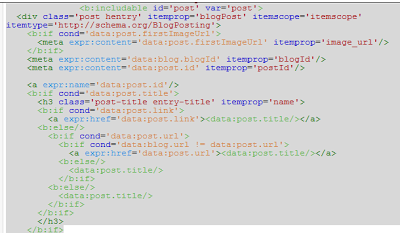
Step 3. Click anywhere inside the code area to find (using CTRL + F) the following code:
<b:includable id='post' var='post'>
Step 4. After you found it, click on the left arrow next to it to expand the widget's code

add icon in blogger post

Step 5. Then delete it until you reach to <div class='post-header'>:
              <b:includable id='post' var='post'>
  <div class='post hentry' itemprop='blogPost' itemscope='itemscope' itemtype='http://schema.org/BlogPosting'>
    <b:if cond='data:post.firstImageUrl'>
      <meta expr:content='data:post.firstImageUrl' itemprop='image_url'/>
    </b:if>
    <meta expr:content='data:blog.blogId' itemprop='blogId'/>
    <meta expr:content='data:post.id' itemprop='postId'/>

    <a expr:name='data:post.id'/>
    <b:if cond='data:post.title'>
      <h3 class='post-title entry-title' itemprop='name'>
      <b:if cond='data:post.link'>
        <a expr:href='data:post.link'><data:post.title/></a>
      <b:else/>
        <b:if cond='data:post.url'>
          <b:if cond='data:blog.url != data:post.url'>
            <a expr:href='data:post.url'><data:post.title/></a>
          <b:else/>
            <data:post.title/>
          </b:if>
        <b:else/>
          <data:post.title/>
        </b:if>
      </b:if>
      </h3>
    </b:if>
The code to be deleted:

add icon in blogger post

Step 6:

Paste the following code in the place of the deleted code in Step 5:
<b:includable id='post' var='post'>
  <div class='post hentry' itemprop='blogPost' itemscope='itemscope' itemtype='http://schema.org/BlogPosting'>
    <b:if cond='data:post.firstImageUrl'>
      <meta expr:content='data:post.firstImageUrl' itemprop='image_url'/>
    </b:if>
    <meta expr:content='data:blog.blogId' itemprop='blogId'/>
    <meta expr:content='data:post.id' itemprop='postId'/>

    <a expr:name='data:post.id'/>
    <b:if cond='data:post.title'>
      <table><tr>
        <td class='posttitle'>
           <img src='IMAGE-URL'/></td>
        <td><h3 class='post-title entry-title' itemprop='name'>
      <b:if cond='data:post.link'>
        <a expr:href='data:post.link'><data:post.title/></a>
      <b:else/>
        <b:if cond='data:post.url'>
          <b:if cond='data:blog.url != data:post.url'>
            <a expr:href='data:post.url'><data:post.title/></a>
          <b:else/>
            <data:post.title/>
          </b:if>
        <b:else/>
          <data:post.title/>
        </b:if>
      </b:if>
      </h3>
        </td>
        </tr></table>
     
      <style>
        h3.post-title {
          margin: 0px !important;
        }
      </style>
   
    </b:if>

Step 7:

Replace the IMAGE-URL text in blue color from above with the URL address of your image (the one that you've gotten from Step 1).

Step 8: Save the Template you are done

Read More

How To add image between blogger post 

 
Read More


Return to top of page
Powered By Blogger | Copyright ©2013 Advance Tutorials And Tricks